If you’ve recently received $GREEN Token and want to see it in your MetaMask wallet, we’ve got you covered. $GREEN Token is available on the ERC-20 chain, BNB network. In this article, we’ll provide you with step-by-step instructions on how to add $GREEN Token to your MetaMask wallet on both desktop and mobile versions.
Desktop Version
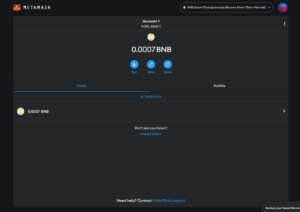
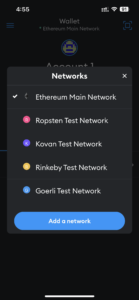
Step 1: Add Binance Smart Chain to your network list
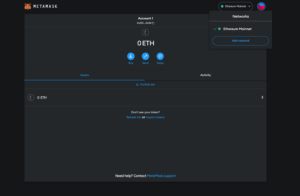
If you’ve never used the Binance Smart Chain before, the first thing you need to do is add it to your network list on MetaMask. To do this, click on the network dropdown on the top right of your MetaMask browser extension and select “Add Network”.
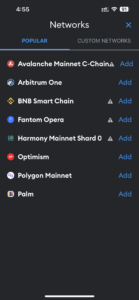
Step 2: Choose Binance Smart Chain
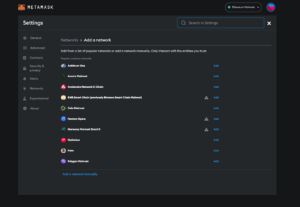
Once you’ve selected “Add Network”, you’ll be taken to a page where a list of networks you can add will appear. Scroll down and select “Binance
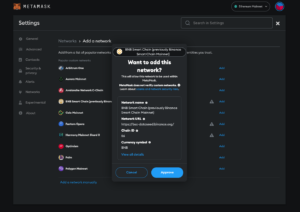
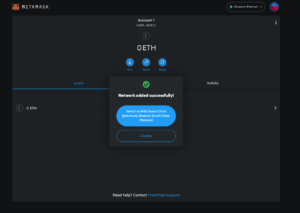
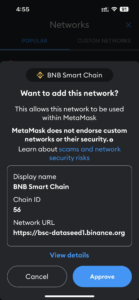
Smart Chain” from the list. A pop-up window will appear with the network details. Click “Approve” and you’ll have successfully added the Binance Smart Chain to your network list.
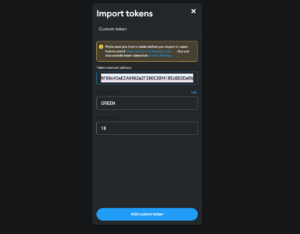
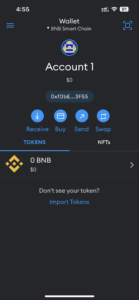
Step 3: Import tokens
If you don’t see your $GREEN tokens in your MetaMask wallet after adding the Binance Smart Chain, you’ll need to import them. To do this, click on the “Import Token”.
Step 4: Insert $GREEN token contract address
In the “Import Token” window, you’ll see a field where you can input the $GREEN token contract address. The contract address for $GREEN is 0xEb29F65c4DaEEA6462a2F280E3Bf418Ec8B3Da9b. After you’ve input this address, click “Add Custom Token”.
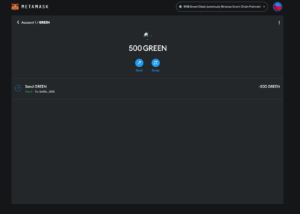
Step 5: See your $GREEN token on MetaMask
After you’ve completed these steps, you should see your $GREEN tokens in your MetaMask wallet. If you’ve followed all of the steps correctly and you still don’t see your tokens, you can try checking the transaction hash to confirm that the tokens were sent to your MetaMask address.
Mobile Version
Step 1: Add Binance Smart Chain to your network list
Open your MetaMask wallet app and tap on the top of the screen, and select “Add Network”
Step 2: Choose Binance Smart Chain
Once you’ve selected “Add Network”, you’ll be taken to a page where a list of networks you can add will appear. Scroll down and select “Binance
Smart Chain” from the list.
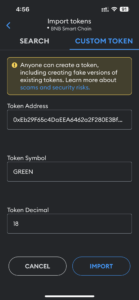
Step 3: Import tokens
If you don’t see your $GREEN tokens in your MetaMask wallet after adding the Binance Smart Chain, you’ll need to import them. To do this, click on the “Import Token”.
Step 4: Insert $GREEN token contract address
In the “Import Token” window, select “Add Token”, tap on “Custom Token” and you’ll see a field where you can input the $GREEN token contract address. The contract address for $GREEN is 0xEb29F65c4DaEEA6462a2F280E3Bf418Ec8B3Da9b. After you’ve input this address, click “Import”.
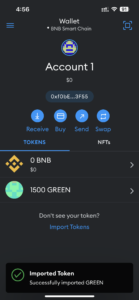
Step 5: See your $GREEN token on MetaMask
After you’ve completed these steps, you should see your $GREEN tokens in your MetaMask wallet. If you’ve followed all of the steps correctly and you still don’t see your tokens, you can try checking the transaction hash to confirm that the tokens were sent to your MetaMask address.
In summary, adding the Binance Smart Chain to your network list and importing your $GREEN tokens to your MetaMask wallet is an easy process that can be done in just a few steps. By following these instructions, you’ll be able to start investing in Regenerative Finance and supporting environmentally sustainable initiatives with ease.
